Thursday, December 22, 2011

Freedom = Time to create!

Whew!  After a gruesome 5 months of student teaching I really haven't left my sewing machine's side:)  I have had all this creativity bottle up inside with no time to let it out (you would think as an art teacher I would be expressing my creativity all the time, but this is different:).  So, I sat down and created this awesome quilt, painting, pillow, and window valance in just one weekend!  My dear friend is having a baby girl in February and I offered to make this for her.  She is just so lucky that if I would have more children OWLS are what I would have totally picked too!  So having owls as my favorite subject and all that bottled up creativity, I created my best work so far.  Check it out!  Hope you loved it Jonna!

Baby quilt with appliqued owls


Acrylic owl painting

Cute little owl pillow ( I had an extra from my appliqueing, so I stuffed it instead:)

All together- quilt, pillow, window valance, and painting.


Check back soon!  I have more things made that I can't wait to share!

Wednesday, August 10, 2011

Pencil Roll


    So my love for drawing passed down to my daughter, so I wanted to make her a pencil/colored pencil holder to keep in her purse for when we are out and about.  Sitting at a restaurant or in the car, this cute roll-up is perfect for her.  Using scraps from her favorite fabrics made it also fun. 
    I used the tutorial from Quilting Arts.  It was very simple and easy to follow.  It took me maybe an hour and a half to complete.  It was the perfect little project to scratch that sewing itch I had:)


Baby Gifts

So my friends are having a baby and I wanted to make them something for their shower.  The baby theme is camo, so I thought it would be so cute to make this little onsie for them!  I thought it turned out great and they loved it:)


I also made them a blanket.  This was another idea I got from my cousin (sorry Stephanie:), I call it a rip blanket.  You layer 4 fabrics with the bottom one facing down (I used flannel so it could be soft), then the other 3 should be layered facing up.  I used white, light orange, and green 100 % cotton.  As you have them sandwiched together, just sew lines about 1/2-1 inch apart, cut between the lines except for the bottom layer (flannel), and finish it off with a cute trim.  It took me a lot a time to make but it turned out really cool and feels neat rubbing your hands across it!  It's very simple, just time consuming:)


                                                Front                                                  Back

Detail

Good Luck Rena and Jeremiah!

Thursday, July 21, 2011

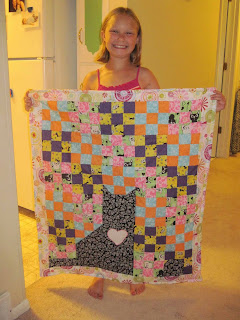
Quilt is done!

Growing up I was a huge cat lover, who am I kidding, I still am!  So when my grandma sent me this pattern I had to make it for my daughter who is also a cat lover (go figure:)  I think I started it around Christmas time and due to my loads of homework this spring, I FINALLY FINISHED IT!  My daughter really loves it.  I let her pick out all the fabric and we had to make the cat black because that is what her cat is (good ol' Tux).


I really enjoy making quilts and can't wait to start another!  This time it will be for me:)

Monday, July 11, 2011

First Post Ever!

    So I am new to this whole blogging thing.  I read many other blogs, so I thought I would give it a try at the request of my friends.  I am an artist and a beginning sewer.  Most of the things I make are for my kids but I love any challenge:)
    Today was one of those days where my creative juices were flowing:)  I created a dress for my daughter and her American Girl doll and also a quilted candle holder.


    I found the cutest solar dresss pattern and tutorial at Indietutes. The pattern only went to a size 7, so with an 8 year old I just increased it touch.  And of course, if my daughter gets a new dress, so does her doll:) The directions are simple and it turned out cute!      


    Something else that has been fun for me to make are quilted candle holders.  I have to give credit to my cousin because I saw one made from her at my grandmas.  They are very simple if you can do any basic quilting. They look like a regular quilting block but the center comes up to hold a candle.  Super cute!  I even auctioned one off for $25 at our family reunion.  Not bad for a beginner:) 


Check back soon, because I have more to share all the time!